Your first PowerShell scripts | Gaining more understanding
It is true that “A Journey of a Thousand Miles Begins with a Single Step”
I had to start a few years ago; this was my first step.
I wanted to check if ‘Google Drive’ was installed on my machine; without using the “Add remove programs and features” window.
Step 1 :Deny yourself the easy option. Do not use the “Add remove programs and features” window. The easy option limits you physically.
Step 2 : Tell a story. Lets consider the following.
- You enter a library.
- You ask the librarian to give you a list of all the books that has “drive” in their name and was written by “google“.
- Add one final piece of instruction for the librarian; you will only ask for the Name, Version and the Vendor.
Step 3 : Lets convert the above story to a PowerShell script.
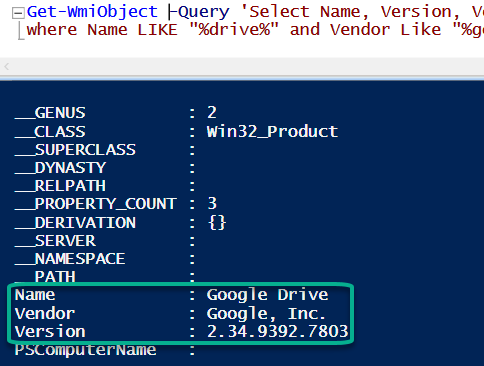
Get-WmiObject -Query ‘Select Name, Version, Vendor from win32_product where Name LIKE “%drive%” and Vendor Like “%google%”‘
Fear not; just focus on your story,
The only aspect of the above story that you would have to remember is Get-WmiObject command. You could also use gwmi as a shortcut.
-Query : This is your question to the librarian.

as mentioned above ‘Query‘ is a question to your Computer (Librarian).
Select – is a keyword (What attributes of the book do you want in the list e.g. Name, Version, Vendor)
What section of the library do you want to search: That is the win32_product.
Where : This a keyword that limits the Librarians search: to books that have “drive” in their name and were written by “google“.
When you run the above command you will get the below response from PowerShell; Only focus on the areas in Green.
‘%‘ this is a wildcard. One or more characters. Could be ‘Whatever drive 45‘ or ‘Super Google‘ or ‘the Googled fantastic‘. You know what I mean. 🙂
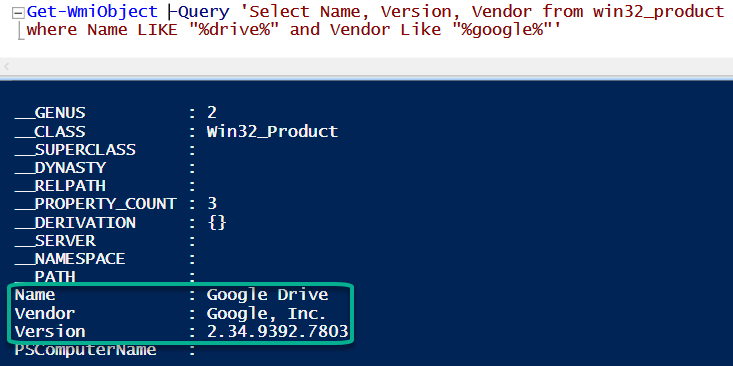
The attributes starting with ‘_’ and ‘PS’ are internal attributes. These are like the ‘Library’ letterhead items.
Why don’t you explore (by yourself) how to hide the internal attributes or only show the attributes Name, Vendor and Version.


I like it. What you’ve written is so true.
The best way to learn PowerShell is incremental learning through real life scenario based application.
Our brain can only take in limited amount of information at any onetime; our unconscious mind learns faster than our conscious mind. So create a real life scenario and use PowerShell to solve it.
For example, create a ‘need’ to identify if 7zip is installed on your machine. Now find an answer via PowerShell. Focus on the drama around getting to the answer.
The next time you want to check the existence of a software in add remove programs you brain might not remember the command, but it will remember the dramatic path to the discovery.
how about this 🙂
$thisIsJustAVariable = Get-WmiObject -Query ‘Select Name, Version, Vendor from win32_product where Name LIKE “%drive%” and Vendor Like “%google%”‘
$thisIsJustAVariable | Select-Object Name, Version, Vendor | Format-List
Good one Mateo. The query takes a lot longer because it loads all of the Objects before displaying it on screen. Wonder if there is a way to fasten things up a notch.